
上一篇,我们学习了 Gulp 的一些基本原理和操作,本文通过小案例,去学习构建一个网页应用的自动化构建工作流。
首先准备一个用于构建网页应用的项目,项目目录大致如下,大家可以使用自己的;
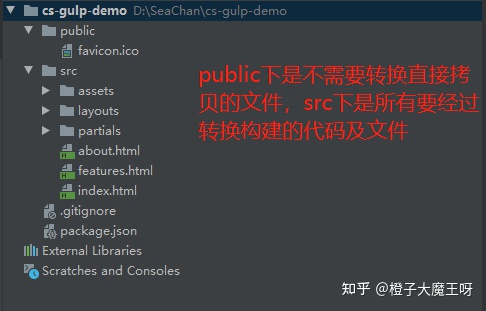
接下来安装gulp到开发依赖,在根目录下新建 gulpfile.js 文件;
样式编译任务
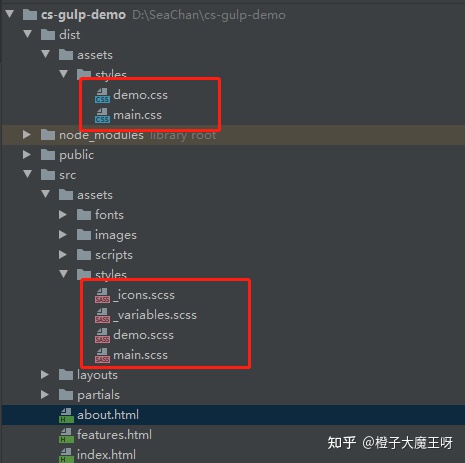
样式文件读取拷贝到目标文件夹,src 第二个参数,base 之后的路径会按照原路径保存在 dist 下,否则所有文件都会直接放在 dist下;
1
2
3
4
5
6
7
8
9
10
| const {src, dest} = require('gulp')
const style = () => {
return src('src/assets/styles/*.scss', {base: 'src'})
.pipe(dest('dist'))
}
module.exports = {
style
}
|
以上执行任务后得到的文件是原文件的拷贝(*.scss),还未完成转换,此时需要安装插件对文件流进行转换,yarn add gulp-sass --dev;
1
2
3
4
5
6
7
8
9
10
11
| const {src, dest} = require('gulp')
const sass = require('gulp-sass')
const style = () => {
return src('src/assets/styles/*.scss', {base: 'src'})
.pipe(sass({outputStyle: 'expanded'}))
.pipe(dest('dist'))
}
module.exports = {
style,
}
|
执行 yarn gulp style 编译完成样式文件,可在 dist 下查看;
PS: 下划线开头的文件,sass 插件会忽略,不会进行转换;
脚本文件编译任务
安装转换流插件,yarn add gulp-babel --dev;执行脚本任务时,会报错 Error: Cannot find module '@babel/core',是因为 gulp-babel 模块并没有转换功能,只是帮我们唤起 @babel/core 转换模块,我们需要手动安装,yarn add @babel/core @babel/preset-env --dev;
1
2
3
4
5
6
7
8
9
10
11
12
13
| const {src, dest} = require('gulp')
const babel = require('gulp-babel')
const script = () => {
return src('src/assets/scripts/*.js', {base: 'src'})
.pipe(babel({presets: ['@babel/preset-env']}))
.pipe(dest('dist'))
}
module.exports = {
style,
script,
}
|
执行 yarn gulp script 编译完成脚本文件,可在 dist 下查看;
页面文件编译任务
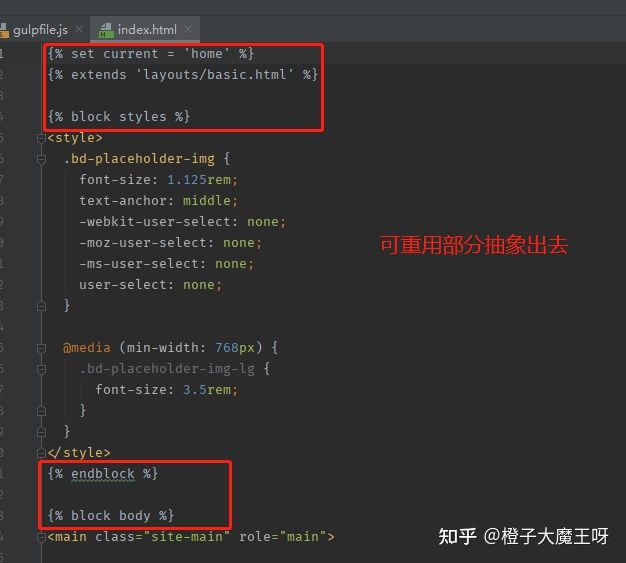
为了让页面中一些可重用的部分抽象出来,可以使用模板引擎,案例中使用 swig,需要先安装 swig 的转换插件,yarn add gulp-swig --dev;
1
2
3
4
5
6
7
8
9
10
11
12
13
14
15
16
17
18
19
20
21
22
23
24
25
26
27
28
29
30
31
32
33
34
35
36
37
38
39
40
41
42
43
44
45
46
47
48
49
50
51
52
53
54
55
| const {src, dest} = require('gulp')
const swig = require('gulp-swig')
const data = {
menus: [
{
name: 'Home',
icon: 'aperture',
link: 'index.html'
},
{
name: 'Features',
link: 'features.html'
},
{
name: 'About',
link: 'about.html'
},
{
name: 'Contact',
link: '#',
children: [
{
name: 'Twitter',
link: 'https://twitter.com'
},
{
name: 'About',
link: 'https://weibo.com'
},
{
name: 'divider'
},
{
name: 'GitHub',
link: 'https://github.com'
}
]
}
],
pkg: require('./package.json'),
date: new Date()
}
const page = () => {
return src('src/*.html', {base: 'src'})
.pipe(swig({data}))
.pipe(dest('dist'))
}
module.exports = {
style,
script,
page,
}
|
执行 yarn gulp page 编译完成页面文件,可在 dist 下查看;
以上完成了样式 + 脚本 + 页面文件的单个构建任务,接下来创建组合任务让他们都一次执行,因为三个任务互不干扰,可以创建并行任务,提高效率;
1
2
3
4
5
6
|
const {parallel} = require('gulp')
const compile = parallel(style, script, page)
module.exports = {
compile
}
|
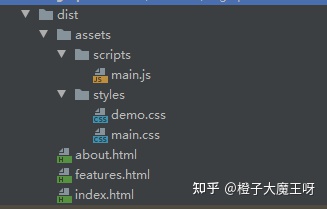
执行 yarn gulp compile 得到组合任务结果:
图片和字体文件的转换
图片文件压缩转换,需要添加插件,yarn add gulp-imagemin --dev;
1
2
3
4
5
6
7
8
9
10
11
12
13
14
15
16
17
18
19
20
| const imagemin = require('gulp-imagemin')
const image = () => {
return src('src/assets/images/**', {base: 'src'})
.pipe(imagemin())
.pipe(dest('dist'))
}
const font = () => {
return src('src/assets/fonts/**', {base: 'src'})
.pipe(imagemin())
.pipe(dest('dist'))
}
const compile = parallel(style, script, page, image, font)
module.exports = {
compile,
}
|
其他文件及文件清除
public 目录下的文件;
1
2
3
4
5
6
7
8
9
10
11
12
13
|
const extra = () => {
return src('public/**', {base: 'public'})
.pipe(dest('dist'))
}
const compile = parallel(style, script, page, image, font)
const build = parallel(compile, extra)
module.exports = {
compile,
build,
}
|
目前整个项目的构建任务基本完成了,但每次执行构建任务都要手动删除 dist 目录,我们使用一个插件来完成每次的自动删除;安装 yarn add del --dev;定义添加一个 clean 任务,用于每次执行构建任务前操作,此时的构建就需要 series 创建一个串行任务,先清空再执行后边的构建任务,然后我们的任务变成了这样:
1
2
3
4
5
6
7
8
9
10
11
12
|
const del = require('del')
const clean = () => {
return del(['dist'])
}
const compile = parallel(style, script, page, image, font)
const build = series(clean, parallel(compile, extra))
module.exports = {
compile,
build,
}
|
自动加载插件
随着构建越来越复杂,其中使用到的插件就越来越多,当我们 require 一堆插件时,代码开始显得很繁杂,我们可以通过一个插件去管理 yarn add gulp-load-plugins --dev;导入插件后对之前使用到的插件做相应替换,代码变成了下边的样子:
1
2
3
4
5
6
7
8
9
10
11
12
13
14
15
16
17
18
19
20
21
22
23
24
25
26
27
28
29
30
31
32
33
34
35
36
37
38
39
40
41
42
43
44
45
46
47
48
49
50
51
52
53
54
55
56
57
58
59
60
61
62
63
64
65
66
67
68
69
70
71
72
73
74
75
76
77
78
79
80
81
82
83
84
85
86
87
88
89
90
91
92
93
94
95
96
97
98
99
100
101
| const {src, dest, parallel, series} = require('gulp')
const loadPlugins = require('gulp-load-plugins')
const plugins = loadPlugins()
const del = require('del')
const data = {
menus: [
{
name: 'Home',
icon: 'aperture',
link: 'index.html'
},
{
name: 'Features',
link: 'features.html'
},
{
name: 'About',
link: 'about.html'
},
{
name: 'Contact',
link: '#',
children: [
{
name: 'Twitter',
link: 'https://twitter.com'
},
{
name: 'About',
link: 'https://weibo.com'
},
{
name: 'divider'
},
{
name: 'GitHub',
link: 'https://github.com'
}
]
}
],
pkg: require('./package.json'),
date: new Date()
}
const style = () => {
return src('src/assets/styles/*.scss', {base: 'src'})
.pipe(plugins.sass({outputStyle: 'expanded'}))
.pipe(dest('dist'))
}
const script = () => {
return src('src/assets/scripts/*.js', {base: 'src'})
.pipe(plugins.babel({presets: ['@babel/preset-env']}))
.pipe(dest('dist'))
}
const page = () => {
return src('src/*.html', {base: 'src'})
.pipe(plugins.swig({data}))
.pipe(dest('dist'))
}
const image = () => {
return src('src/assets/images/**', {base: 'src'})
.pipe(plugins.imagemin())
.pipe(dest('dist'))
}
const font = () => {
return src('src/assets/fonts/**', {base: 'src'})
.pipe(plugins.imagemin())
.pipe(dest('dist'))
}
const extra = () => {
return src('public/**', {base: 'public'})
.pipe(dest('dist'))
}
const clean = () => {
return del(['dist'])
}
const compile = parallel(style, script, page, image, font)
const build = series(clean, parallel(compile, extra))
module.exports = {
compile,
build,
}
|
热更新开发服务器
以上是代码的构建基本流程,除了代码构建,我们还需要在开发阶段启动一个服务器用于调试代码;gulp 也为我们提供了相应的功能,配合其他的构建任务,在我们代码修改过后完成自动的编译,自动地刷新浏览器页面;
首先安装一个 browser-sync 的模块,yarn add browser-sync --dev;
1
2
3
4
5
6
7
8
9
10
11
12
13
14
15
16
17
18
19
20
21
22
| const browserSync = require('browser-sync')
const bs = browserSync.create()
const serve = () => {
bs.init({
notify: false,
port: 2080,
files: 'dist/**',
server: {
baseDir: 'dist',
routes: {
'/node_modules': 'node_modules'
}
}
})
}
module.exports = {
compile,
build,
serve,
}
|
yarn gulp serve 执行任务后,浏览器自动启动并打开项目默认页面,修改 dist 目录下的文件,页面能实时刷新;
监视变化以及构建优化
现在我们有了开发服务器,也能实时监视 dist 目录下的变化实时刷新浏览器,但实际开发过程中,我们修改的代码并不是 dist 目录,此时我们还需要另一个插件 watch 来帮助监听某个路径下的变化来决定是否要重新执行的任务;
1
2
3
4
5
6
7
8
9
10
11
12
13
14
15
16
17
18
19
20
21
22
23
24
| const {src, dest, parallel, series, watch} = require('gulp')
const serve = () => {
watch('src/assets/styles/*.scss', style)
watch('src/assets/scripts/*.js', script)
watch('src/*.html', page)
watch('src/assets/images/**', image)
watch('src/assets/fonts/**', font)
watch('public/**', extra)
bs.init({
notify: false,
port: 2080,
files: 'dist/**',
server: {
baseDir: 'dist',
routes: {
'/node_modules': 'node_modules'
}
}
})
}
|
保存后重启 serve 任务,修改 src 下的任意文件,浏览器即可实时同步刷新。
以上完成后还需对任务做一些调整,将静态资源(图片字体等)的构建任务放在 build 下,然后将 compile 和 serve 放一起成为开发阶段的组合任务 develop;
1
2
3
4
5
6
7
8
9
10
11
12
13
14
15
16
17
18
19
20
21
22
23
24
25
26
27
28
29
30
31
32
33
34
35
36
37
38
39
|
const serve = () => {
watch('src/assets/styles/*.scss', style)
watch('src/assets/scripts/*.js', script)
watch('src/*.html', page)
watch([
'src/assets/images/**',
'src/assets/fonts/**',
'public/**',
], bs.reload)
bs.init({
notify: false,
port: 2080,
files: 'dist/**',
server: {
baseDir: ['dist', 'src', 'public'],
routes: {
'/node_modules': 'node_modules'
}
}
})
}
const compile = parallel(style, script, page)
const build = series(clean, parallel(compile, image, font, extra))
const develop = series(compile, serve)
module.exports = {
compile,
build,
develop,
}
|
此时执行启动 develop 任务后,生成的 dist 下图片字体等静态资源的文件是没有的,通过 baseDir 下从 src 和 public 下取,开发过程中减少了构建任务;
bs.init 中监听files的参数可以去掉,改为对应的任务后使用 .pipe(bs.reload({stream:true})) ,结果一样可以得到想要的热更新,只是写法上的差异;
1
2
3
4
5
6
7
8
9
10
11
12
13
14
15
16
17
18
19
20
21
22
23
|
const style = () => {
return src('src/assets/styles/*.scss', {base: 'src'})
.pipe(plugins.sass({outputStyle: 'expanded'}))
.pipe(dest('dist'))
.pipe(bs.reload({stream: true}))
}
const script = () => {
return src('src/assets/scripts/*.js', {base: 'src'})
.pipe(plugins.babel({presets: ['@babel/preset-env']}))
.pipe(dest('dist'))
.pipe(bs.reload({stream: true}))
}
const page = () => {
return src('src/*.html', {base: 'src'})
.pipe(plugins.swig({data, defaults: { cache: false }}))
.pipe(dest('dist'))
.pipe(bs.reload({stream: true}))
}
|
useref 引用文件处理
通过 build 任务我们需要得到一个最终发布版本的包,但之前我们在 bs 服务中做了一个路由映射处理了 node_modules 下边的依赖,如果线上使用该构建包,相应的依赖是找不到的,现在需要对它们进一步处理;
我们使用一个插件 useref ,yarn add gulp-useref -- dev ,它能根据对应的注释模板,将其中相应引入路径下的文件,编译转换后放到注释中规定的目录文件中;如下,会将 "/node_modules/bootstrap/dist/css/bootstrap.css" 找到并编译压缩后放在 assets/styles/vendor.css 中,如果 build 和 endbuild 之间有多个文件,将统一放在一个文件中;
1
2
3
|
<link rel="stylesheet" href="/node_modules/bootstrap/dist/css/bootstrap.css">
|
添加 useref 任务
1
2
3
4
5
6
7
8
9
10
11
| const useref = () => {
return src('dist/*.html', {base: 'dist'})
.pipe(plugins.useref({searchPath: ['dist', '.']}))
.pipe(dest('dist'))
}
module.exports = {
compile,
build,
develop,
useref,
}
|
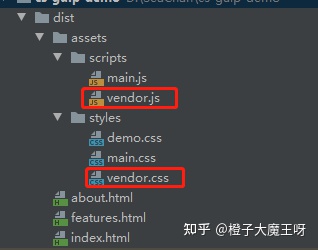
执行 useref 任务后,dist/assets/styles 下的多了 vendor.css ,dist/assets/scripts 下多了 vendor.js ,html 中涉及node_modules 的依赖也已相应转换;


文件压缩
上边使用 useref 后,我们已经能得到相关的 css 和 js 文件,但是都是内容全拷贝过来的,我们还可以对其进行一系列的压缩减少构建包的大小;针对 html,css,js 安装相应的插件进行压缩,yarn add gulp-htmlmin gulp-clean-css gulp-uglify --dev ,此时还需要一个判断文件类型的插件,yarn add gulp-if --dev ,判断文件后针对不同文件使用不同的压缩插件;
1
2
3
4
5
6
7
8
9
10
11
12
| const useref = () => {
return src('dist/*.html', {base: 'dist'})
.pipe(plugins.useref({searchPath: ['dist', '.']}))
.pipe(plugins.if(/\.html$/, plugins.htmlmin({
collapseWhitespace: true,
minifyCSS: true,
minifyJS: true
})))
.pipe(plugins.if(/\.css$/, plugins.cleanCss()))
.pipe(plugins.if(/\.js$/, plugins.uglify()))
.pipe(dest('release'))
}
|
重新执行 compile 和 useref 到 release 目录查看相应文件吧;
重新规划构建过程
使用 useref 后,我们之前的构建结构被打破了,我们之前定好的打包目录是 dist ,但是使用 useref 时为了解决文件冲突,我们重新放在了 release 目录,即 release 成了要上线的包文件,然而 release 下现在又没有图片字体等静态资源文件,所以需要对构建任务进行重新规划;思路:之前的任务使用 temp 临时目录,最后将 temp 目录下的文件转化后归整到 dist ;
调整后代码为:
1
2
3
4
5
6
7
8
9
10
11
12
13
14
15
16
17
18
19
20
21
22
23
24
25
26
27
28
29
30
31
32
33
34
35
36
37
38
39
40
41
42
43
44
45
46
47
48
49
50
51
52
53
54
55
56
57
58
59
60
61
62
63
64
65
66
67
68
69
70
71
72
73
74
75
76
77
78
79
80
81
82
83
84
85
86
87
88
89
90
91
92
93
94
95
96
97
98
99
100
101
102
103
104
105
106
107
108
109
110
111
112
113
114
115
116
117
118
119
120
121
122
123
124
125
126
127
128
129
130
131
132
133
134
135
136
137
138
139
140
141
142
143
144
145
146
147
148
149
150
151
152
153
154
155
156
157
158
159
| const {src, dest, parallel, series, watch} = require('gulp')
const del = require('del')
const loadPlugins = require('gulp-load-plugins')
const plugins = loadPlugins()
const browserSync = require('browser-sync')
const bs = browserSync.create()
const data = {
menus: [
{
name: 'Home',
icon: 'aperture',
link: 'index.html'
},
{
name: 'Features',
link: 'features.html'
},
{
name: 'About',
link: 'about.html'
},
{
name: 'Contact',
link: '#',
children: [
{
name: 'Twitter',
link: 'https://twitter.com'
},
{
name: 'About',
link: 'https://weibo.com'
},
{
name: 'divider'
},
{
name: 'GitHub',
link: 'https://github.com'
}
]
}
],
pkg: require('./package.json'),
date: new Date()
}
const style = () => {
return src('src/assets/styles/*.scss', {base: 'src'})
.pipe(plugins.sass({outputStyle: 'expanded'}))
.pipe(dest('temp'))
.pipe(bs.reload({stream: true}))
}
const script = () => {
return src('src/assets/scripts/*.js', {base: 'src'})
.pipe(plugins.babel({presets: ['@babel/preset-env']}))
.pipe(dest('temp'))
.pipe(bs.reload({stream: true}))
}
const page = () => {
return src('src/*.html', {base: 'src'})
.pipe(plugins.swig({data, defaults: {cache: false}}))
.pipe(dest('temp'))
.pipe(bs.reload({stream: true}))
}
const image = () => {
return src('src/assets/images/**', {base: 'src'})
.pipe(plugins.imagemin())
.pipe(dest('dist'))
}
const font = () => {
return src('src/assets/fonts/**', {base: 'src'})
.pipe(plugins.imagemin())
.pipe(dest('dist'))
}
const extra = () => {
return src('public/**', {base: 'public'})
.pipe(dest('dist'))
}
const clean = () => {
return del(['dist', 'temp'])
}
const serve = () => {
watch('src/assets/styles/*.scss', style)
watch('src/assets/scripts/*.js', script)
watch('src/*.html', page)
watch([
'src/assets/images/**',
'src/assets/fonts/**',
'public/**',
], bs.reload)
bs.init({
notify: false,
port: 2080,
server: {
baseDir: ['temp', 'src', 'public'],
routes: {
'/node_modules': 'node_modules'
}
}
})
}
const useref = () => {
return src('temp/*.html', {base: 'temp'})
.pipe(plugins.useref({searchPath: ['temp', '.']}))
.pipe(plugins.if(/\.html$/, plugins.htmlmin({
collapseWhitespace: true,
minifyCSS: true,
minifyJS: true
})))
.pipe(plugins.if(/\.css$/, plugins.cleanCss()))
.pipe(plugins.if(/\.js$/, plugins.uglify()))
.pipe(dest('dist'))
}
const compile = parallel(style, script, page)
const build = series(
clean,
parallel(
series(compile, useref),
image,
font,
extra
)
)
const develop = series(compile, serve)
module.exports = {
clean,
build,
develop,
}
|
构建任务补充
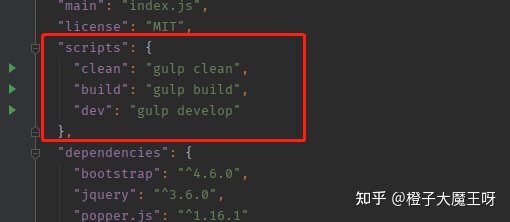
将导出的任务定义到 package.json 的 scripts 中,使用 yarn clean 等命令执行任务;
在 .ignore 文件中添加 temp 和 dist 目录;
以上就是使用 gulp 创建构建任务的整个流程,只要把这个作为模板使用就行,后续我们还可以对工作流进行封装发布,我们下一篇再见。console.log(‘Gulp ♥♥♥’)


